


Maintaining the engine’s performance is essential for any vehicle owner, and one of the most critical components in this maintenance is the spark plugs. In Ford vehicles, the condition of these small yet powerful components can significantly influence engine efficiency and overall driving experience. Understanding how to replace spark plugs in your Ford is crucial for ensuring optimal performance and preventing potential engine issues.
This guide provides detailed insights into the timing and essential tips for replacing spark plugs on various Ford models. Whether you’re a DIY enthusiast or a novice looking to enhance your automotive skills, knowing when and how to perform this maintenance task is invaluable. From the right tools to the step-by-step replacement process, we cover everything you need to ensure that your Ford runs smoothly and efficiently.
Replacing your spark plugs not only improves the ignition process but also contributes to better fuel efficiency and reduced emissions. Knowing the signs that indicate a need for replacement, such as poor acceleration or misfiring, can save you time and money in the long run. Let’s dive into the specifics of spark plug replacement and equip you with the knowledge needed for success.
Replacing Spark Plugs on a Ford: Tips and Timing Guide
Replacing spark plugs is a crucial maintenance task for Ford vehicles that enhances ignition efficiency and engine performance. Regularly changing spark plugs ensures that the ignition system functions optimally, reducing fuel consumption and emissions.
Before starting, gather necessary tools: a socket wrench, a torque wrench, anti-seize compound, and new spark plugs that match your specific Ford model. Always refer to the owner’s manual for the correct specifications regarding spark plug type and gap settings.
Timing is essential. Ideally, spark plugs should be replaced every 30,000 to 100,000 miles, depending on the type of plugs used and your driving conditions. If you notice poor acceleration, misfiring, or reduced fuel efficiency, it’s time to check and possibly replace the spark plugs.
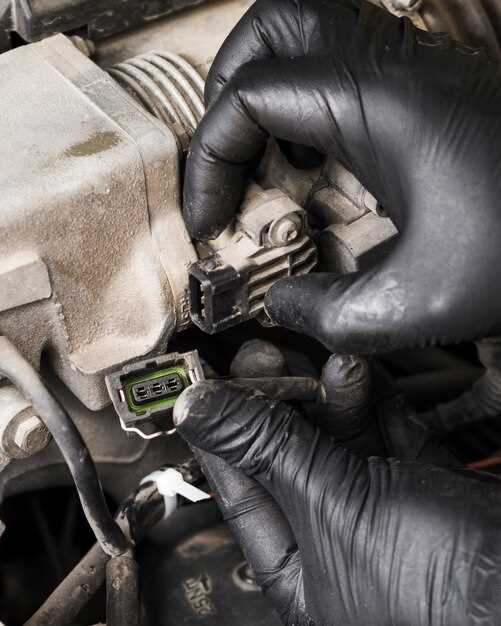
Begin the process by ensuring the engine is cool to avoid burns. Disconnect the negative battery terminal to prevent electrical issues during the replacement. Remove the ignition coil or plug wires carefully to avoid damage. Use the socket wrench to extract the old spark plugs, taking care to inspect the condition for signs of wear or carbon buildup.
When installing new spark plugs, apply a small amount of anti-seize compound to the threads to prevent seizing in the future. Ensure the spark plugs are tightened to the manufacturer’s specified torque to ensure a proper seal and effective ignition.
After replacing the spark plugs, reassemble the ignition components and reconnect the battery. Start the engine to check for smooth operation. If issues persist, further diagnostics may be necessary.
Identifying the Right Spark Plug for Your Ford Model
Choosing the correct spark plug for your Ford vehicle is crucial for optimal engine performance and ignition efficiency. Every Ford model has specific ignition requirements that depend on engine type, fuel system, and design. To ensure you are selecting the right spark plug, start by consulting your owner’s manual or manufacturer specifications, which provide essential details regarding the types of spark plugs suitable for your engine.
Next, pay attention to the spark plug’s heat range, which indicates how effectively it can remove heat from the combustion chamber. An incorrect heat range can lead to pre-ignition or fouling, negatively impacting engine performance. Ford vehicles often require spark plugs with a specified heat range, so verify that the replacement you choose matches these specifications.
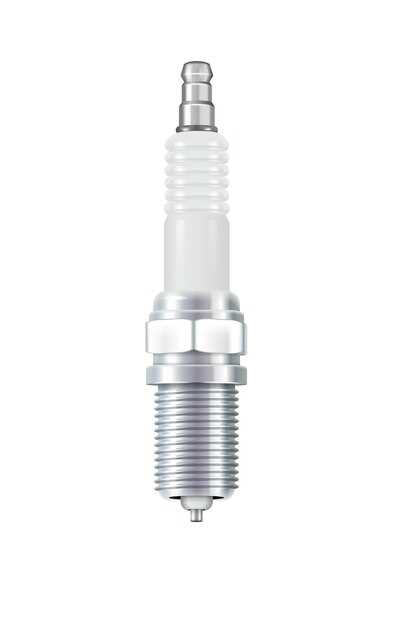
The type of spark plug material is another crucial factor. Copper, platinum, and iridium are common materials used in spark plugs, each offering varying durability and performance benefits. For example, iridium plugs tend to last longer and provide better ignition efficiency than standard copper plugs. Consider your driving habits, as well as the environment in which you typically drive, to determine the most suitable material for your needs.
Additionally, check the spark plug gap, which is the distance between the center and ground electrode. Proper gap size is vital for effective ignition. If the gap is too wide or too narrow, it can result in misfires or poor engine performance. Always refer to your vehicle’s specifications for the recommended gap size and adjust accordingly before installation.
Finally, ensure that the spark plug design, including features like resistor types and electrode configuration, aligns with your specific Ford model. This will help maintain consistent ignition and efficient combustion, ultimately contributing to the longevity of your engine. By taking the time to identify the right spark plug, you can enhance the performance and reliability of your Ford vehicle.
Step-by-Step Process for Changing Spark Plugs Safely
Changing spark plugs on your Ford is a vital maintenance task that can enhance engine performance and fuel efficiency. Follow this step-by-step guide to ensure the process is done safely and effectively.
1. Gather Necessary Tools and Materials: Before starting, collect all required tools, including a socket wrench, spark plug socket, torque wrench, and a gap gauge. Obtain the correct ignition plugs for your specific Ford model.
2. Disconnect the Battery: Safety is paramount. Begin by disconnecting the negative terminal of the battery. This will prevent any electrical shorts or accidental ignition while you work.
3. Remove Ignition Coils: Depending on your Ford model, you may need to remove the ignition coils to access the spark plugs. Start by detaching any connectors and bolts securing the coils in place. Carefully lift them out without damaging any surrounding components.
4. Clean the Area: Use a clean cloth or compressed air to remove dirt and debris around the spark plug holes. This prevents contaminants from entering the combustion chamber when you remove the plugs.
5. Remove Old Spark Plugs: Utilize a spark plug socket and ratchet to unscrew the old plugs. Turn counterclockwise until they are free. Take care not to apply excessive force that might damage the threads in the engine.
6. Check Plug Gap: Before installing the new ignition plugs, verify that the gap is set according to your vehicle’s specifications. Use a gap gauge to make adjustments, if necessary, to ensure optimal engine performance.
7. Install New Spark Plugs: Carefully screw in the new plugs by hand to avoid cross-threading. Once they are snug, use a torque wrench to tighten them to the manufacturer’s specified torque setting. This ensures they are properly secured without being overtightened.
8. Reattach Ignition Coils: After replacing the plugs, reinstall the ignition coils. Ensure that each coil is securely fastened and that electrical connectors are firmly attached.
9. Reconnect the Battery: Once everything is back in place, reconnect the negative battery terminal. This will restore power to the ignition system.
10. Test the Engine: Finally, start your Ford and listen for any irregular noises. Observe the engine performance to confirm that the spark plug replacement was successful.
By following these detailed steps, you can safely change the spark plugs in your Ford and maintain the efficiency of your ignition system.
Troubleshooting Common Issues After Spark Plug Replacement
Replacing spark plugs can significantly improve engine performance, but sometimes issues may arise after the replacement. Here are some common problems you might encounter and how to address them:
- Improper Installation
- Ensure spark plugs are seated correctly. Misalignment can prevent proper ignition.
- Check torque specifications. Over-tightening can damage the threads, while under-tightening can lead to spark plug loosening during operation.
- Fouled Plugs
- If the new plugs are already fouled, check for oil leakages or excessive fuel delivery, causing an improper air-fuel mixture.
- Inspect the ignition system. Weak spark can lead to fouling, requiring a thorough check of ignition coils and wiring.
- Misfiring Engine
- A misfiring issue could indicate a faulty spark plug or an issue in the ignition system. Conduct a visual inspection and utilize an OBD-II scanner for diagnostics.
- Verify the spark plug gap setting. Incorrect gaps can lead to weak or inconsistent spark.
- Rough Idle
- Inspect the connections for any loose or damaged wires related to the ignition system. Poor connections can cause rough idling.
- Examine the air filter and fuel injectors. Clogged components can cause unbalanced air-fuel mixtures, affecting engine performance.
- Check Engine Light
- If the check engine light activates after replacement, use a diagnostic tool to check for error codes related to ignition or fuel systems.
- Common codes may indicate issues with ignition coils or misfiring cylinders that need further investigation.
Addressing these common issues after spark plug replacement can help ensure a smooth-running engine and prevent further complications. Always refer to the vehicle’s manual for specific details related to your model.

